


This article will look at PipeOps and Netlify as prominent platforms for deploying and hosting websites and web applications.
Over the past few years, the ecosystem has seen the emergence of many platforms and services for hosting and deploying websites. However, more recently, a new game-changer has entered the market with its brilliant services and features!
While both Pipeops and Netlify offer powerful solutions, PipeOps has uniquely positioned itself as a game-changer for Nigerian developers. Its array of features and advantages make it a compelling choice over Netlify.
PipeOps; the DevOps Platform you Need
PipeOps is a powerful data operations platform that simplifies the process of building and managing data pipelines. Additionally, developed by a team of experienced engineers, PipeOps aims to empower developers with a user-friendly interface, a rich set of tools, and seamless integrations with various data sources and destinations.
Also, as a cloud infrastructure solutions platform, PipeOps enables developers and organizations to seamlessly deploy their simple or complex applications to the cloud significantly reducing the number of post-deployment tasks engineers go through when setting up their applications for usage on production servers. In the same way, PipeOps has consistently pushed the boundaries of what is achievable. Especially, changing the status quo for how seamlessly anyone can deploy their application to the cloud.
Netlify, on the other hand, is a platform for hosting and deploying static websites and web applications. It offers a streamlined workflow, continuous deployment, and advanced features for optimizing website performance and security.
How to Deploy to the Cloud on PipeOps
One of the key advantages of PipeOps is its straightforward deployment process. Therefore, with a few simple steps, developers can effortlessly deploy their data pipelines and applications, ensuring a smooth and hassle-free experience.
Step 1: Create a PipeOps Account
Getting started with PipeOps is as easy as creating an account on their website.
With PipeOps, you can choose from the multiple ways from which to create your account, including GitHub and BitBucket.

Step 2: Choose your preferred server hosting platform
On PipeOps, you can choose your preferred server hosting platform. Both of the given options offer a wide range of integrations with various data sources, including databases, cloud storage, and business intelligence tools. Connecting your data sources is a breeze, thanks to PipeOps’ user-friendly interface and comprehensive documentation.

For this article, we will be choosing to create on PipeOps.
Step 3: Customize your server
After you have chosen your preferred server hosting platform, you will be directed to a page where you can customize your server.

Step 4: Pricing
You will be prompted to select your pricing plan next. PipeOps offers a wide range of prices. You can choose between the Nova Sapa, Nova Pro, Nova Duo, or Nova Chrono server instances. Each instance comes with varying amounts of VCPU, Memory, and storage.
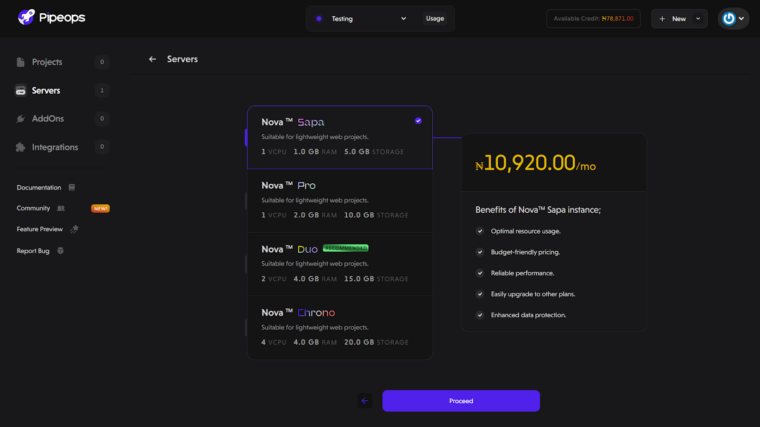
For the purpose of this article, we will be choosing the Nova Sapa
Step 5: Choose your deployment location
On PipeOps, you can choose where to pull the files or applications for deployment or hosting. Additionally, its version control system allows you to track changes and roll back if needed, ensuring seamless collaboration.
You can decide to deploy from your online repository (Github, Gitlab or Bitbucket) or from a fresh template in our template library.
We will be using the GitHub choice for this article.

Step 6: Choose the project source
When you have successfully synced with your Github, you will be shown a page that prompts you to choose from where (repository) the project is being taken.You would also choose the branch and the project template.

Step 7: Project Configuration
After making your selections in step 6, you will be prompted to make some project configurations like choosing the environment and the resource allocation for the project you want to deploy.

Step 8: Build commands
From here, you specify the build settings for the project.

If everything checks out and there is no problem with your build:
Congratulations! You just deployed your app onPipeOps!!

Why PipeOps Stands Out for Nigerian Developers
While both PipeOps and Netlify offer excellent solutions for their respective domains, PipeOps holds several advantages that make it a standout choice for Nigerian developers:
Support for Naira Payments and Localized Pricing between PipeOps and Netlify
One of the most significant advantages of PipeOps for Nigerian developers is its support for Naira payments.
In contrast, Netlify primarily accepts payments in foreign currencies. PipeOps offers localized pricing and allows developers to pay in Naira, making it more accessible and cost-effective for the Nigerian market.
Ease of Use and Comprehensive Documentation for PipeOps and Netlify
PipeOps has been designed with a strong focus on usability and developer experience. Additionally, its intuitive interface, visual pipeline builder, and extensive documentation make it easier for developers to get started and navigate through the platform’s features. Furthermore, this can be particularly beneficial for developers who are new to data pipeline management.
Simplified & Affordable Onboarding on PipeOps
Pipeops has revamped its onboarding process, making it more seamless for new customers joining the PipeOps ecosystem. Additionally, PipeOps now offers Managed Servers, allowing customers to deploy their applications at a fraction of the cost they would typically spend on other cloud providers. On the other hand, Netlify’s onboarding process makes it easy for users to get around the platform.
To cater to their Nigerian customer base, PipeOps has introduced support for payments in local currencies, making it more convenient and cost-effective for Nigerian customers to access their services. Furthermore, PipeOps has introduced a reward system called “PipeOps credits,” designed to incentivize customers who are looking for an easy deployment option as they migrate their applications to the PipeOps platform. In contrast, Netlify does not yet support payment in Naira.
Simplified Monitoring dashboard on PipeOps
Finally, PipeOps has simplified its resource monitoring dashboard, making it easier for customers to track the resources they consume on the platform and efficiently manage their subscriptions.

Post-Deployment Tasks in PipeOps
PipeOps excels in providing post-deployment features that streamline the development and deployment lifecycle. Its integration with popular CI/CD tools, such as GitHub and GitLab, enables automated deployment workflows, ensuring that changes to your code are seamlessly integrated and deployed to your production environment. Netlify, on the other hand, also offers such features.
Responsive Customer Support and Community in PipeOps and Netlify
Additionally, PipeOps prides itself on providing exceptional customer support and fostering an active community of developers. Furthermore, Nigerian developers can benefit from prompt support, access to documentation and resources, and the opportunity to collaborate and share knowledge with other PipeOps users.
Conclusion
In conclusion, while both PipeOps and Netlify offer robust solutions for their respective domains, PipeOps emerges as a game-changer for Nigerian developers due to its comprehensive features, localized pricing, ease of use, and continuous improvements. With its focus on simplifying data pipeline management, providing post-deployment features, and fostering a supportive community, PipeOps empowers Nigerian developers to streamline their workflows, enhance productivity, and deliver high-quality data-driven applications efficiently.
